


After months of hard work, you finally deployed your app on market and people are loving it. Now you are wondering how you can monetize it.
In this blog post, I am going to show you how you can easily integrate In-App Subscriptions in your React Native application using RevenueCat.
If you prefer video format, check out this video where I cover this topic in-depth, with real examples:
What are In-App Subscriptions
In-App subscriptions allow you to monetize your application by providing extra content or features to pro users in exchange for a monthly/yearly fee. For example, you might subscribe to Spotify on a monthly basis and get extra features, no ads, and other benefits.
In-app subscriptions MUST be handled by the Apple AppStore or Google Play market, because this is their business model, and they keep 30% of your revenue. Yeah, that's a bummer, but we are not going to discuss that today.
This restriction makes it much more complicated to manage In-app subscriptions, especially when you are building a cross-platform application with React Native. You have to integrate with both the play market and with apple store in-app subscriptions. This quickly becomes unmanageable, costly to maintain, and quite error-prone.
How can RevenueCat help us?
RevenueCat provides us a unified API to manage in-app subscriptions across the Play market, Appstore, and also Stripe (with you are building for web). Now, we have a single source of truth, and it becomes much easier to manage it in the code. Just have a look at the code you need to write in order to buy a subscription: await Purchases.purchasePackage(package);. That's it. Everything else is done by RevenueCat.
React Native Integration
Let's integrate RevenueCat into our application and configure it, display products, buy products and also manage users.
Prerequisites
I have prepared a simple React Native application that we are going to use for the purpose of this demo. You can download the application and a step-by-step guide here.
You will have to create an account and a new application on RevenueCat, as well as set up the products on Play Market and/or App Store. I walk through these steps in the youtube video, but in this post, I am going to cover only the coding part.
Install react-native-purchases
- First of all, let's install the library by running
yarn add react-native-purchasesornpm install react-native-purchases - [iOS only] Install the iOS native dependencies with
npx pod-install - Add Billing permissions for the android app in
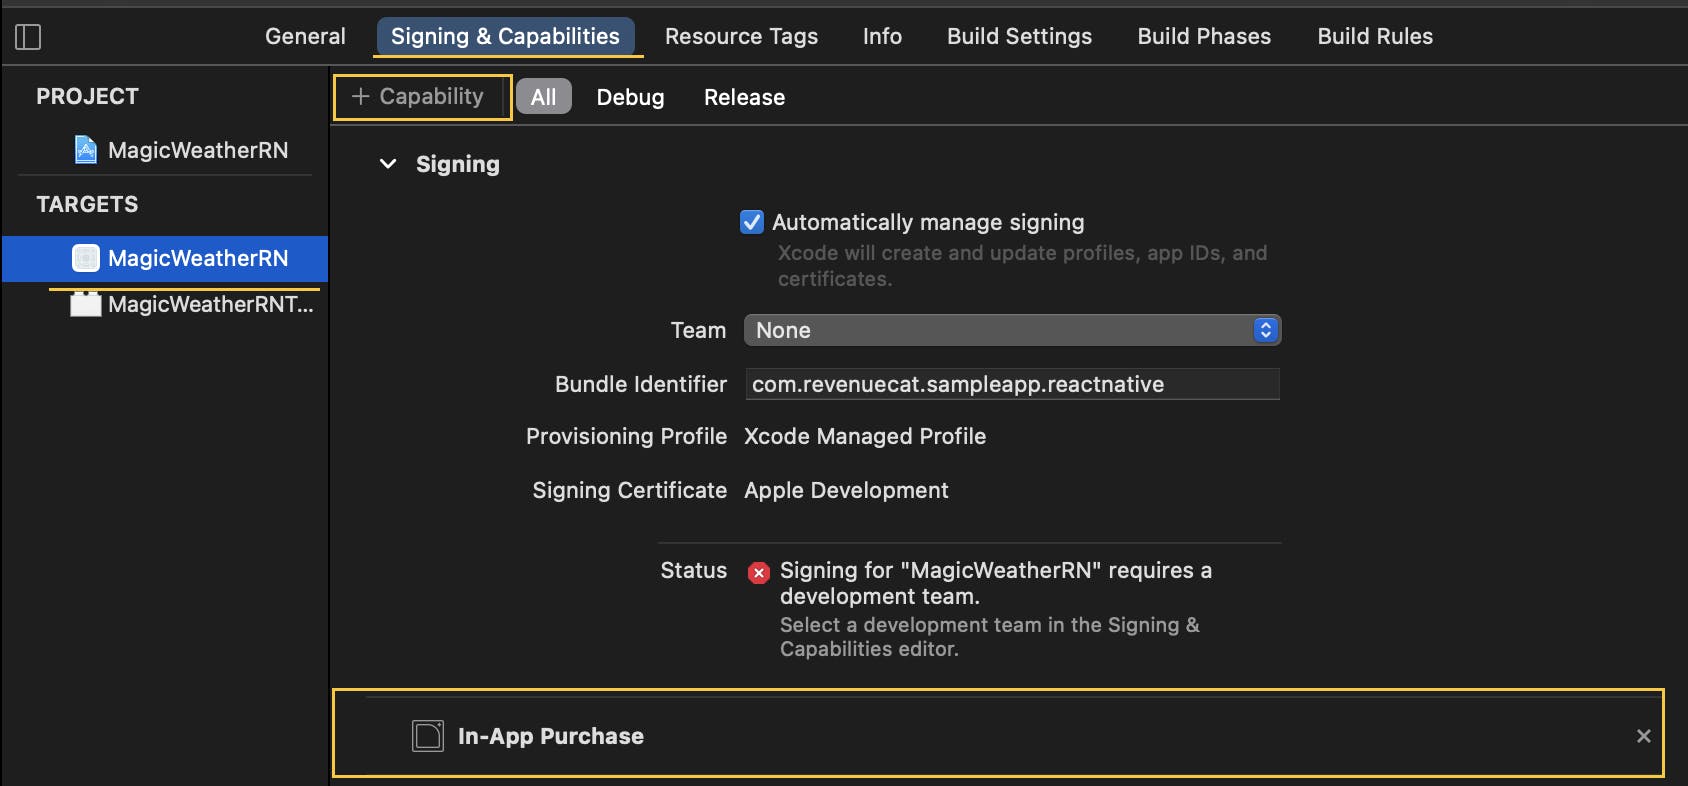
android/app/src/main/AndroidManifest.xmljust above the<application....<uses-permission android:name="com.android.vending.BILLING" /> <uses-permission android:name="android.permissions.INTERNET" /> - To enable In-app purchases on ios, open the project in XCode, and in the Project Target, Capabilities tab, add a new capability "In-App Purchases"
Configure Purchases
We need to configure the purchases as soon as our application opens. That's why, we are going to do that in our App.js file, inside a useEffect hook that is going to run when the app first mounts. Make sure to update your API_KEY inside src/constants/index.js
useEffect(() => {
    /* Enable debug logs before calling `setup`. */
    Purchases.setDebugLogsEnabled(true);

    /*
      Initialize the RevenueCat Purchases SDK.
      - appUserID is nil, so an anonymous ID will be generated automatically by the Purchases SDK. Read more about Identifying Users here: https://docs.revenuecat.com/docs/user-ids
      - observerMode is false, so Purchases will automatically handle finishing transactions. Read more about Observer Mode here: https://docs.revenuecat.com/docs/observer-mode
      */
    Purchases.setup(API_KEY, null, false);
  }, []);
Display available Products on the Paywall
There is no redirect to the Paywall screen yet. Let's edit the /src/screens/WeatherScreen/index.js and navigate to the paywall navigation.navigate('Paywall'); in the performMagic function. Now, whenever we will press on the "Change wether" button, we will be redirected to the Paywall.
You can find the UI for our paywall in /src/screens/PaywallScreen/index.js. We are going to fetch all available products when the paywall screen mounts by calling Purchases.getOfferings(). First, we will check if we have a current active offering and if that offering contains packages we will then store the packages in our state to be displayed on the screen.
  useEffect(() => {
    // Get current available packages
    const getPackages = async () => {
      try {
        const offerings = await Purchases.getOfferings();
        if (offerings.current !== null && offerings.current.availablePackages.length !== 0) {
          setPackages(offerings.current.availablePackages);
        }
      } catch (e) {
        Alert.alert('Error getting offers', e.message);
      }
    };

    getPackages();
  }, []);
If you do not see any packages, checkout this article
Make a Purchase
Our subscription packages are rendered as separate component, that you can find in /src/components/PackageItem/index.js.
Whenever the user presses on the subscription package, we will try to buy it, by calling Purchases.purchasePackage(purchasePackage). If the action succeeds, we redirect the user back and he will have all the PRO features.
const onSelection = async () => {
    try {
      const { purchaserInfo } = await Purchases.purchasePackage(purchasePackage);

      if (typeof purchaserInfo.entitlements.active[ENTITLEMENT_ID] !== 'undefined') {
        navigation.goBack();
      }
    } catch (e) {
      if (!e.userCancelled) {
        Alert.alert('Error purchasing package', e);
      }
    }
  };
Check subscription status
RevenueCat makes it very easy to check the subscription status of a user by grouping the packages into entitlements. In our code, we have to check only if the user is Entitled to do some actions, without having to check whether he bought the monthly subscription from the play market, or the yearly from the apple store.
Let's check if the user is PRO whenever he presses on the "Change weather" button on the main screen. We are going to edit the performMagic function in the src/screens/WeatherScreen/index.js file.
If the user has an active PRO membership, we will change the weather, otherwise, we will redirect him to the paywall.
 const performMagic = async () => {
    /*
     We should check if we can magically change the weather (subscription active) and if not, display the paywall.
     */

    try {
      // access latest purchaserInfo
      const purchaserInfo = await Purchases.getPurchaserInfo();

      if (typeof purchaserInfo.entitlements.active[ENTITLEMENT_ID] !== 'undefined') {
        setWeatherData(generateSampleData(Environment.EARTH));
      } else {
        navigation.navigate('Paywall');
      }
    } catch (e) {
      Alert.alert('Error fetching purchaser info', e.message);
    }
  };
Restoring purchases
If a user uninstalls and then reinstalls the app, you have to give him the possibility to restore previously bought subscriptions. To do that, we can add a "Restore transactions" button in our app, and call Purchases.restoreTransactions() method. This will re-sync any purchases they've previously made with RevenueCat.
Get data about the user
We can get information about the user, such as his App id, if he has an anonymous id, if he has an active subscription, and more. Here is a snippet of code on how to do it.
// src/screens/UserScreen/index.js
// get the latest details about the user (is anonymous, user id, has active subscription)
  const getUserDetails = async () => {
    setIsAnonymous(await Purchases.isAnonymous());
    setUserId(await Purchases.getAppUserID());

    const purchaserInfo = await Purchases.getPurchaserInfo();
    setSubscriptionActive(typeof purchaserInfo.entitlements.active[ENTITLEMENT_ID] !== 'undefined');
  };
Identify the user on Login
If you have an authentication system, and your users have an assigned id in your application, you can set the same id for the user in RevenueCat. This will help you map the users from your database with the users from RevenueCat. Whenever you log the users in your system, you can call
await Purchases.identify("my_app_user_id")
When you logout the user from your application, you can also reset all the RevenueCat information about the user on the device. This will make sure that if he logs in with another account, he won't be able to share the same subscription.
await Purchases.reset();
Conclusion
Congrats 🥳 You have now implemented a fully-featured subscription purchasing system without spending a month writing server code.
You can download the final code, with RevenueCat integrated from Purchases Examples.